Unfortunately "AT" doesn't exactly make a good unique search term! So I'll ask an obvious question, hoping for a not so apparent answer. How do I open this here Model F AT?
Looks pretty regular right?
image1.jpeg (505.12 KiB) Viewed 14574 times
But (excuse the horribly shitty borrowed iPhone picture) the plastic underside has no screws along the front edge:
image6.jpeg (357.08 KiB) Viewed 14574 times
I've undone the screws along the top, and wiggled around quite a bit, but what I presume are tabs in there down front just aren't giving. I really don't want to snap anything. Anyone experienced got the trick?
I've also got a space bar that's half attached, as I was surprised to find a stabilsing wire beneath the barrel frame (what I thought was the XT style) instead of on top like all the other keys and spacebars I've dealt with. Hmm. I haven't snapped anything yet, fortunately!
Posted: 30 Jan 2015, 19:15
by seebart
if I remember correctly decline the feet and the top (where the cable is) should drop down. Careful! No scottish brute force on this. Don´t try to open the bottom. I think it hinges there. I can get mine and take a look if you want.
Push the knobs of the feet inward while tilting the back away from the cable and the back will drop!
Posted: 30 Jan 2015, 19:21
by Muirium
I do want! I've got the top edge open just fine, but the front is adamant that it wants to stay put. Damnit, I prefer screws to hidden bits.
Posted: 30 Jan 2015, 19:23
by andrewjoy
its just catches as far as i remember , just need something to slowly separate them. you ever opened an older mac mini ? its like that
EDIT
space bar is a pain in the arse , i have given up on my AT until i can be bothered to do an ansi conversion with a model m sized spacebar
Posted: 30 Jan 2015, 19:27
by seebart
could the back be stuck somehow on the feet mechanism? There is nothing else necessary to open the AT!
Posted: 30 Jan 2015, 19:31
by andrewjoy
no you dont but if its stubborn a thin bit of plastic against the join may help
once you get inside you will see the crazy quality of the AT plastic its IBM's best ever plastic
EDIT
strange my AT has cork feet like the XT
Posted: 30 Jan 2015, 19:32
by Muirium
It's a stubborn sunnuvabitch this one. Texan, see!
seebart wrote: could the back be stuck somehow on the feet mechanism? There is nothing else necessary to open the AT!
The feet are well out the way, my good Sith Lord. This is all happening in a single seam down the front edge of the board.
andrewjoy wrote: its just catches as far as i remember , just need something to slowly separate them. you ever opened an older mac mini ? its like that
EDIT
space bar is a pain in the arse , i have given up on my AT until i can be bothered to do an ansi conversion with a model m sized spacebar
Yeah, not my kind of spacebar, although I thought you were into them extra long! My plan is to swap out fatty assed Enter for an ANSI one and backslash, then use the latter HHKB delete style. The empty barrels look promising for a simple flipper insert.
As for old Mac Minis, you'd use a thin metal shim to convince them, right? I tried some soft plastic, but the AT case is much too hardcore and snapped it.
Posted: 30 Jan 2015, 19:39
by seebart
andrewjoy wrote: strange my AT has cork feet like the XT
mine doesn't! Those cork feet are great though. Must be available somewhere online.
Hmm "State of Texas Department of Human Recources" I see! I bet that AT has seen some action!
Posted: 30 Jan 2015, 19:42
by Muirium
I'm missing a couple of feet on this one. No cork anywhere indeed.
Were they all plastic tabbed like this? I thought I saw a video of some geezer opening one up before, with screws at the front. Would be so much easier!
SEEBART EDIT: The caps all scrubbed up real pretty, apart from spacebar which is still attached. It's definitely had a ton of use, but doesn't seem to feel any worse for it. I'm keen to get it apart so I can clean out all the crud, though. And the thick AT cable is well manky with sticky grime. Needs a good wash.
Posted: 30 Jan 2015, 19:52
by andrewjoy
Muirium wrote:
Yeah, not my kind of spacebar, although I thought you were into them extra long!
I do love them long ........ but the AT one is too stiff to press down, i like them long and soft.
Posted: 30 Jan 2015, 19:54
by Muirium
Long and soft? Damn, girl, make up your mind!
Here's the video I watched a while back. Well, skimmed. The guy makes the hairs on my neck crawl. But then I'm very picky about what I'll watch in general:
Terrible video! He sped up the important part. I mistook two dark feet at the front of his board for two more screw holes. Oh well. Can't make out his trick for opening it all up at Benny Hill speed.
Posted: 30 Jan 2015, 19:59
by seebart
Muirium wrote: SEEBART EDIT: The caps all scrubbed up real pretty, apart from spacebar which is still attached. It's definitely had a ton of use, but doesn't seem to feel any worse for it. I'm keen to get it apart so I can clean out all the crud, though. And the thick AT cable is well manky with sticky grime. Needs a good wash.
yup these old F´s will come out of a cleanig looking great regardless of how "much action" they`ve seen! It´s like polishing old silver.
I`ve seen that video! The guy is either a creepy freak or acting like one! I mean I´m into keyboards but I don´t go off like that, it´s kinda disgusting a bit at few points in the video.
Posted: 30 Jan 2015, 20:04
by andrewjoy
Muirium wrote: Long and soft? Damn, girl, make up your mind!
Here's the video I watched a while back. Well, skimmed. The guy makes the hairs on my neck crawl. But then I'm very picky about what I'll watch in general:
I am subbed to that channel, some cool stuff on there , i think if you scroll down you can see my comments
Re: Opening an IBM AT
Posted: 30 Jan 2015, 20:15
by Nuum
The case is indeed just hinged on the front, just pull it apart gently. You will hear some horrible screaking, but you will not damage your AT. I've opened my AT several times now and the screaking still scares me.
Posted: 30 Jan 2015, 21:09
by Muirium
Thanks Nuum. That gave me the confidence to keep going, and finally I'm in. The technique? "Gie it laldy, son!" Translation: with great force.
No harm done. It really is a tough bastard. Nice!
I'm still stumped by the spacebar though. One of its two stabs is still hooked in, and no amount of wiggling seems to convince it to come free. Bugger!
Posted: 30 Jan 2015, 21:18
by seebart
Muirium wrote: Thanks Nuum. That gave me the confidence to keep going, and finally I'm in. The technique? "Gie it laldy, son!" Translation: with great force.
No harm done. It really is a tough bastard. Nice!
jeez sounds like a tough case!
Posted: 30 Jan 2015, 21:22
by Muirium
She was, son, she was. Could have sworn she was from Greenock, but no! American born and bred.
Posted: 30 Jan 2015, 22:06
by scottc
Good to know! I had the same issue with mine but didnae gie it laldy at all and just gave up. I'll have to try again tonight.
Posted: 30 Jan 2015, 22:44
by idollar
A couple of tips for those that want to restore an AT. A am sure that everyone knows them, but just in case ...
1.- you may be interested in this thread
2.- I cleaned the case with a product (liquid solvent) to remove stickers. It dilutes all dirt and the cover did not suffer. If needed I can post a picture.
3.- All the keycaps go you BUT THE SPACE. You need to dismantle the keyboard to remove it. Check again the tread above for details
i$
Posted: 31 Jan 2015, 01:37
by Muirium
Oooh! Now that's the thread my ham-fisted searching should have found, superb i$!
Posted: 31 Jan 2015, 19:34
by idollar
This is the product that I use to clean the cases. It works like a dream.
Posted: 10 Feb 2015, 16:53
by Muirium
Okay, here I am inside the AT now. The spacebar stab is just as annoying as everyone says — boy am I glad this is a Model F so it's pretty trivial to open up the insides once the damn case is off — and now I have the PCB exposed I see there are indeed extra pads for another pair of mods.
IMG_7277.JPG (357.04 KiB) Viewed 14333 times
They look connected, too.
IMG_7265.JPG (548.21 KiB) Viewed 14333 times
Who's used these for a Model M spacebar + mods, uh, mod? Naturally, there's work required on the other layers:
IMG_7287.JPG (283.21 KiB) Viewed 14333 times
IMG_0643.JPG (363.08 KiB) Viewed 14333 times
Two different cameras, two crappy pictures. Way to go Scottish winter cloudlight!
Anyway, my immediate plan is to simply install an extra flipper for the backslash key so I can use an ANSI Return and ditch Mr. Big Ass. Should have one around here somewhere. I removed the little black stab insert from underneath Return before taking these pictures. Guess I should pop in a few of the Model M ones in the right places wherever I put on new caps.
One more thing, the controller:
IMG_7262.JPG (543.29 KiB) Viewed 14333 times
IMG_7264.JPG (492.32 KiB) Viewed 14333 times
I pulled the cables out for the AT cable and LED daughter board. I'm guessing they simply align at the far ends of this header, with the blanked pins. LED connector toward the front:
image12-1.jpeg (449.92 KiB) Viewed 14333 times
And the AT at the back:
image6-1.jpeg (494.8 KiB) Viewed 14333 times
The AT cable is still a bit gummy even after cleaning, so I'm going to do an internal Soarer's converter job on this board and replace it with a USB cable or socket. Here's the pinout:
Should be an ideal job for my one and only Pro Micro, actually.
Re: Opening an IBM AT
Posted: 10 Feb 2015, 17:26
by seebart
Your pictures are just fine. I have an AT project waiting for me also, this is a good "motivator" for me.
Posted: 10 Feb 2015, 21:01
by idollar
I will save the picture with the pinout of the cable. Useful, Indeed.
Posted: 10 Feb 2015, 21:04
by idollar
BTW: does not make more sense to post your process in the thread that I started to have a single reference ?
This was my initial intention, to have a reference thread. My pictures complement yours.
Posted: 10 Feb 2015, 21:06
by idollar
Another comment: I will need to open my AT again. The space bar is harder than a "normal" m, what makes the keyboard somehow odd. You may want to think about applying the AT-space-bar fix also.
Posted: 11 Feb 2015, 00:49
by Muirium
I'm just throwing my pictures into this thread for my own convenience. Feel free to duplicate them in your own thread if you like, i$, as I always do that with everyone else's stuff! Use [img] tags and they don't get duped on the server.
Anyway, here's where I'm at:
IMG_0658.JPG (538.3 KiB) Viewed 14288 times
No Teensy yet. I'm still using the gummy wire. And the fiddly-to-reassemble spacebar isn't registering. Argh! It clicks just fine though, so that confuses me. I made sure to hold the flipper in position while closing the layers, too. Bugger.
Anyway, I took the opportunity to try my layout. Every other key works just fine, via my external Soarer box, and I've got them reassigned to match those new legends. You can likely guess where the Unicomp caps have gone just by the colour of them, plus the legends. Needless to say, I really prefer this HHKB layout to the AT's big ass enter. And that numpad / navigation block seems to work pretty good too. I don't use a numpad much anyway (so few of my boards have them) but the arrow keys: bonus!
I just needed to drop in two Model M stabiliser inserts, and two extra Model F flippers. Good and adaptable these old IBMs!
Next time: going back inside again to fix the spacebar, and a Pro Micro or Teensy to make this a fully USB keyboard.
(Actually, I remembered I had some spare IBM caps, and pulled off all the Unicomps besides ANSI Return. The one from this set is already on my Kishsaver! Anyway, they're matching better now.)
Posted: 11 Feb 2015, 03:35
by Mal-2
That is certainly an interesting numpad arrangement. Where are you hiding NumLock (I presume it's a combo of some sort)? If there isn't one, how are you getting to Home, End, and Insert? Any plans to reroute traces and free up the extra \| key? This could let you slide `~ and Backspace back over, and put NumLock back where it belongs.
Posted: 11 Feb 2015, 09:27
by seebart
very interesting layout Mu!
The fact that I have an AT lying around with plenty IBM caps makes me want to try this too!
Have you used this layout now? Feedback on usability please!
Posted: 11 Feb 2015, 10:47
by Muirium
Plenty of caps, eh? You wouldn't happen to have a spare IBM original ANSI Return key would you? That's my only Unicomp cap now, and its creamy colour (and fuzzy, condensed print) is making my eyebrows twitch!
IMG_0666.JPG (470.2 KiB) Viewed 14240 times
So, so dark…
Now, as for the layout, I tested it for navigation during a bit of browsing last night. Seems good to me, though without a working spacebar (which I'm investigating next) I couldn't do too much else! All the caps must come off again as I strip the keyboard once more, in search of whatever's wrong with that one flipper. I'm still perplexed it can click nicely while sending no signal. Perhaps I'll swap it with another one just in case.
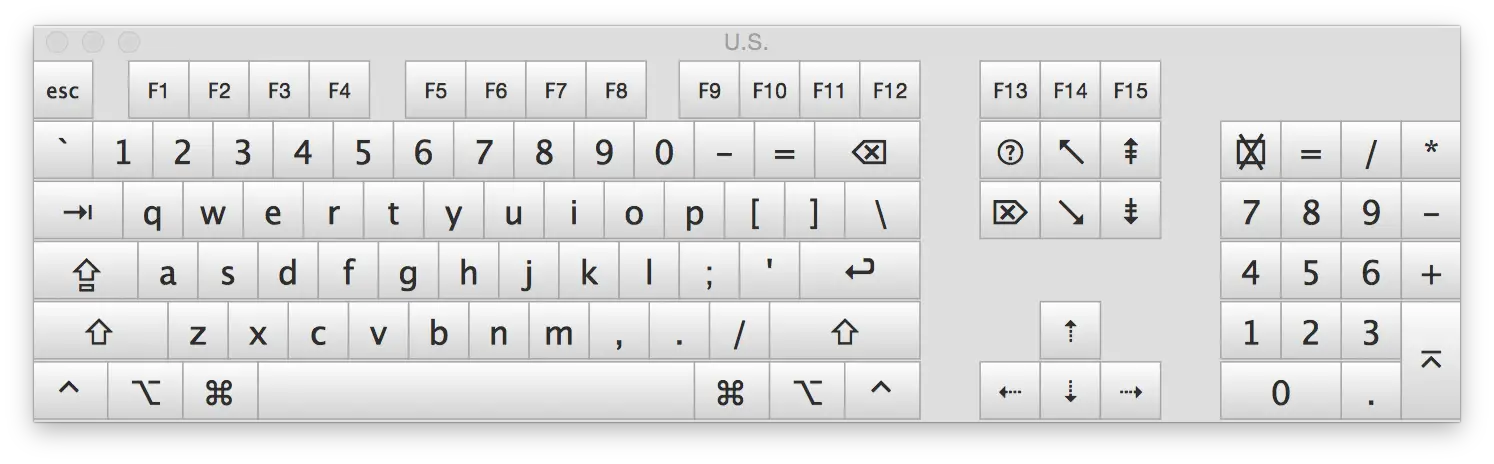
Regarding Num Lock: remember, I'm a Mac guy. Num Lock is a vestigial key on Macs, which never used IBM's numpad/nav keys in the first place. Instead, all (ANSI) keyboards look like this to OS X:
Num Lock becomes the amusingly aptly named "Clear" key, which is pretty useless in its own right. Indeed, a lot of Mac software just plain ignores that key, because it's not exactly crystal what it does. What other kind of delete do you need than left delete (Backspace) and right delete (Delete)? I'm entirely used to living without it on my TKLs, and indeed my MacBook Pro's built in keyboard! The HHKB is the only non-fullsize keyboard I have that includes it, even on the function layer!
So I nixed it. Instead, I thought of the 4x5 numpad block as an open matrix I could map anyway I liked. So I put in the inverted T arrow cluster, of course, right where I expect it from my "other TKLs". Then I dropped in the numeric section of the actual numpad a row higher where it would fit, with a sly bit of moving the period key down. Thank goodness for row-agnostic IBM caps! Imagine doing this on row sculpted profiles. Yuck.
That left me with a column of 4 keys to assign any which way I want, right beside the main 60% block. A nice place to have them. They are as their labels say, for now. But that's indeed the section I can see more experimenting with.
No need to re-route traces or anything fancy on this board. It's a Model F, everything is there and ready by default! The capsense pads that were previously obscured by large keys all still send signals through the controller, which Soarer's Converter intercepts and I can then remap. So my "backslash" key above ANSI Return (previously obscured by Big Ass Enter) is now a fully functional Backspace key, HHKB style. That explains why I didn't put a traditional Backspace up on the top row: I'm going HHKB with the main block. All of those work just like on the HHKB as well. The only thing I was missing was the artfully placed Fn key, which I've typically placed where Control is on the AT; normally the Caps Lock key.
What I decided since then was to remap the AT's bottom row "Caps Lock" (currently my right Command key) to Fn so I can do everything truly HHKB style, one handed like on my Kishsaver. The AT has a full set of mods on the left (I use F9, F10 and Alt as Control, Option and Command) so a well placed Fn is much more valuable than a second Command key.
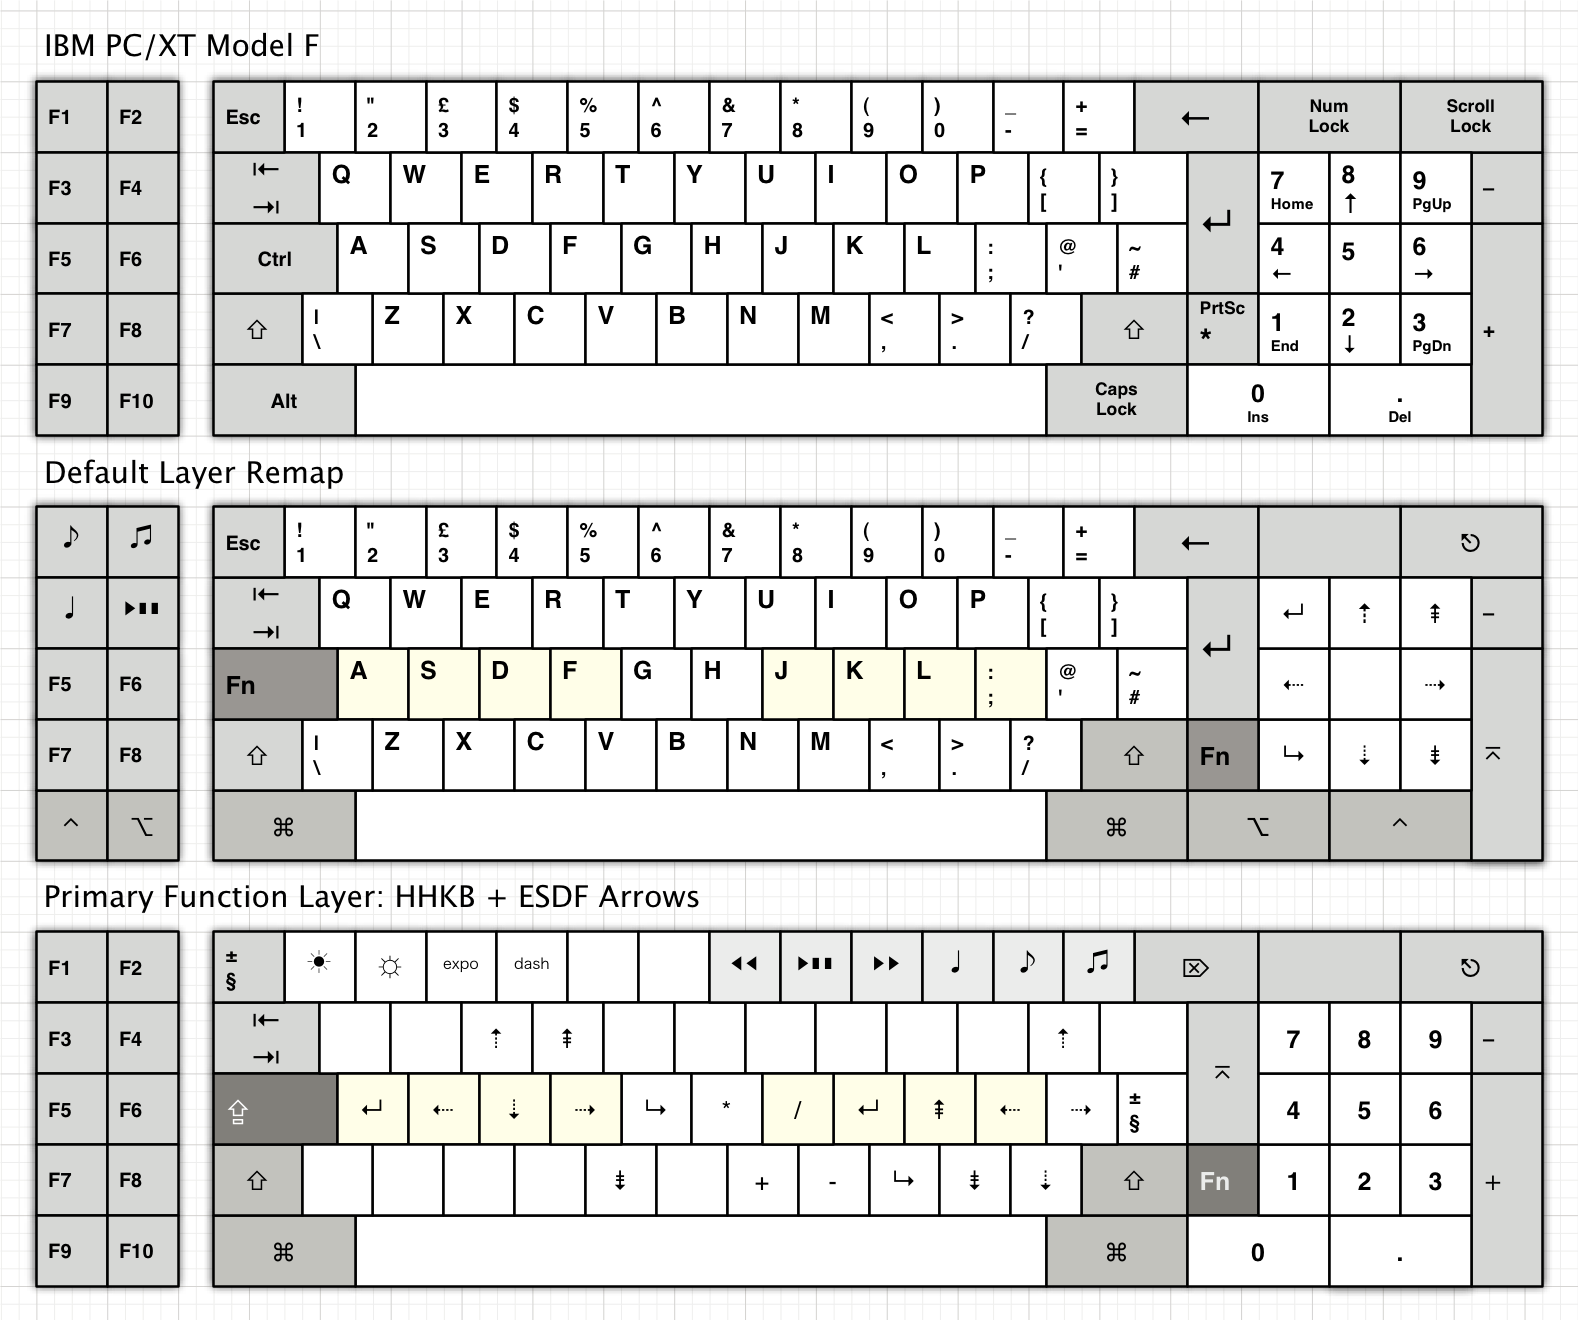
That's how I square the circle for Home and End (and all the other navigation legends on the numpad). Fn + Numpad 7 = Home. The OS doesn't need to know where that Home key actually lives, it's just sent the code. I'm used to this on my XT, where I didn't move any keys but used remaps for everything instead. On that board, I use the numpad as a navigation block, then use the Fn layer to give me access to the numbers when I need them:
I'll make a similar diagram for the AT when I'm settled into it. The AT will be quite different from the XT, because of its luxury of native arrow keys and neater overall symmetry.
Now, about USB sockets and that plastic case… I'm not thinking of drilling it! there's plenty enough space for something small in the slot where the stock AT cable comes out the back. I just need something that mounts there.