Page 1 of 2
Yet another IBM 5251 restoration
Posted: 07 Nov 2017, 19:08
by pansku
Posted: 07 Nov 2017, 19:27
by codemonkeymike
To get the plate to that state I think it was either heat treated (annealed) or chemically oxidized or possibly anodized. I am not exactly a materials chemist but I play one on the internet. IMO you should clean it thoroughly then seal the surface rather then trying to remake the surface. I have used everbrite on the door knobs in my house and have held up well.
https://www.everbritecoatings.com/how_t ... icture.htm
As for removing rust from the springs I used Naval Jelly. Works well but reeks of sulfur.
Posted: 07 Nov 2017, 19:42
by pansku
codemonkeymike wrote: To get the plate to that state I think it was either heat treated (annealed) or chemically oxidized or possibly anodized. I am not exactly a materials chemist but I play one on the internet. IMO you should clean it thoroughly then seal the surface rather then trying to remake the surface. I have used everbrite on the door knobs in my house and have held up well.
https://www.everbritecoatings.com/how_t ... icture.htm
As for removing rust from the springs I used Naval Jelly. Works well but reeks of sulfur.
I read that the yellow passivation is some form of electrolytic zinc coating with some chrome thing mixed up in it. One of the sites has this picture:

and the result seems to be what I'm looking for, a yellowish corrosion resistant coating which shines in the colours of the rainbow. Stupid me just can't figure out the word in english for the process.
Posted: 07 Nov 2017, 20:33
by Slom
Posted: 07 Nov 2017, 20:40
by pansku
Thank you! I do feel dumb now because of my poor google-fu

Posted: 07 Nov 2017, 20:48
by seebart
Posted: 07 Nov 2017, 20:54
by codemonkeymike
Now I feel stupid, we did this in Chem II lab.
Anyway, Galvanization is easy Chromate conversion is hard. Also Chromate ions are toxic. We had to use nitrile gloves, face-masks and had toxic waste removal for Chromate. I bet you can find an electroplating company to do it for you but I cant imagine it being cheap.
Posted: 07 Nov 2017, 21:09
by pansku
Do any of you happen to know the original painting method of the bottom part? When asking people I know I got mixed responses. One said powder coated and other one said you can't achieve such a grainy surface by powder coating. Now I'm just left confused and not knowing which companies to quote from for a fresh coat of paint.
Also has ellipse ever mentioned which RAL or Pantone color he ended up using? It looks prerry similar to the one on the beam spring
Posted: 04 Dec 2017, 13:29
by pansku
Yikes, it took me a few weeks to find a place who will do galvanization and chromatic conversion to private customers without a bank busting price(30€). Just dropped of the 2 pieces for the plating and hopefully by next week I'll see what the results looked like. The plate which holds the switches is quite corroded and the surface isn't smooth even after sanding with powertools. Good thing the pieces are super thick.
But most important thing I need to do before going back to hometown for x-mas is finding the chemicals to hopefully de-yellow the keycaps. No one at either the university electronics club nor radio club had done such work so no tips from there. Have any of you guys tried retrobrighting white on gray or white on black keycaps? I could really use some tips on that process

Posted: 06 Dec 2017, 19:33
by pansku
Bumperino.
I'm still curious if anyone has succesfully retrobrighted/de-yellowed mostly dark keycaps. I've only found the thread of XMITs cautionary tale.
Some of the caps
really could use some treatment:


The background is white paper towel to give you an idea about what white should be in the picture
Posted: 08 Dec 2017, 19:11
by Sangdrax
I've done dark keycaps but they required repolishing to get it right. Not sure how you'd do it without ruining the texture on caps like those. Maybe just submerge in liquid peroxide indoors and watch it closely. You want the retrobright to work slow enough you catch it before the colors start to leech.
Posted: 08 Dec 2017, 20:08
by andrewjoy
Look at the video the 8 bit guy did . He heated the plastic in a pan with the liquid type not the cream and it was super even.
Posted: 09 Dec 2017, 22:55
by orihalcon
Selectric caps will work, but the texture will be smooth. Perhaps they can be sandblasted to add texture?
Posted: 11 Dec 2017, 16:27
by pansku
Thanks for the tips. I watched that 8bit guys videos and I'll try source some hydrogen peroxide and test on 1 "easily" replaceable alphanumeric first. Thanks to some folks at brussels over 12% concentration requires a purchase license for private customers but not companies???. I'll ask a pharmacy for pricing this week to see if I can get some from close to home because the mail company is mega slow near christmas.
The plates came back from being galvamized, but due to communication error they are only zinc plated. I don't have the energy to get them chromatically converted so the final finish will have to wait for a later date. The plating did only end up costing 10e so it's not the end of the world. I'll grab some pictures when I head back home for christmas. Luckily my dad had some PTFE-spray lube for the switches so I can save some money. Now I just need to find a plastic safe penetrating lubricant from the garage. Small steps of progress

Posted: 17 Dec 2017, 14:06
by pansku
Some controller related pics:
The original cable is over 11mm thick

And despite the german keycaps the cable says Italy and Data/Ditta on the other side

- Original cable
- IMG_20171213_180429.jpg (3.09 MiB) Viewed 5616 times
But the connector is in shocking condition

- Original connector
- IMG_20171213_180230.jpg (2.44 MiB) Viewed 5616 times
And the ICs date the controller back 40 years to 1977

- Some ICs with dates on them
- IMG_20171213_180321.jpg (2.71 MiB) Viewed 5616 times
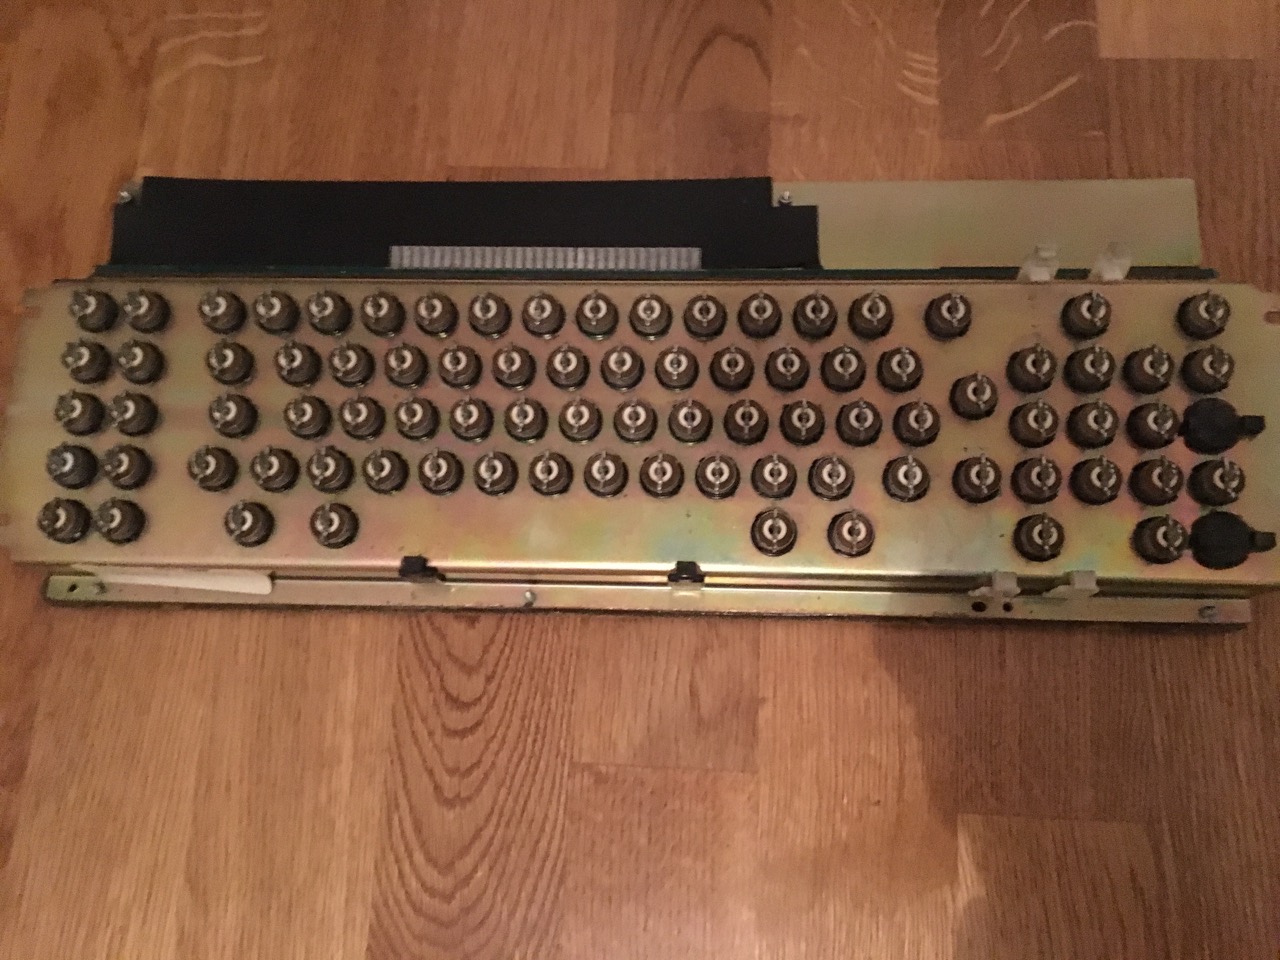
Metal bits:

- Bottom side of the PCB backplate
- IMG_20171217_144549.jpg (3.48 MiB) Viewed 5616 times

- Top side of the PCB backplate
- IMG_20171217_144538.jpg (3.59 MiB) Viewed 5616 times

- Top side of the mounting plate
- IMG_20171217_144618.jpg (3.93 MiB) Viewed 5616 times
Removing the paint revealed that this part also has a dedicated part number. Too bad that the underside is heavily corroded. Even sanding with power tools wasn't enough. Good thing it will hide from sight.

- Underside of the mounting plate
- IMG_20171217_144645.jpg (3.9 MiB) Viewed 5616 times
And a family shot of some heavy steel:

- All the big metal parts
- IMG_20171217_144808.jpg (3.31 MiB) Viewed 5616 times
Posted: 22 Dec 2017, 19:14
by pansku
The monologue continues. Switches are now torn apart and everything is cleaned except stems and coil springs which need some derusting. The switches were a giant pain in the ass to disassemble, but once I got a can of Würth Rost Off Plus things got easier. The really bad thing is that I won't get the hydrogen peroxide until 2.1.2018 due to some failure in the ordering system of the online store

So keycaps will have to wait for their turn. Unfortunately also parts of the sliders and housings have discoloured to a more rusty tone. On the positive side I haven't broken anything, yet, and the Rost Off didn't damage the plastics nor the O-rings. Some pics of the current state:

- Housings and sliders
- IMG_20171222_200304.jpg (4.26 MiB) Viewed 5578 times

- Foam parts removed
- IMG_20171222_200318.jpg (2.73 MiB) Viewed 5578 times

- O-rings cleaned
- IMG_20171222_200328.jpg (2.99 MiB) Viewed 5578 times
Now a question to those who own a beamer, do your keyboards have plastic or anything between the two metal parts which hold together the PCB and switch assembly? Mine had some electricians tape and the Displaywriter guide had plastic parts. I'm not sure if I should put some tape there when it's time to assemble the beast.
Posted: 22 Dec 2017, 19:55
by codemonkeymike
pansku wrote: [...]
Now a question to those who own a beamer, do your keyboards have plastic or anything between the two metal parts which hold together the PCB and switch assembly? Mine had some electricians tape and the Displaywriter guide had plastic parts. I'm not sure if I should put some tape there when it's time to assemble the beast.
So between the two plates were they bolt together should be a thin piece of foam. One side of the foam is adhered to the switch plate and the other side of the foam is adhered to a thin piece of plastic. I think the foam is 1/16th inch but I am not 100% on that.
Posted: 22 Dec 2017, 20:05
by pansku
Thanks for the picture. I think I'll assemble it roughly the same way it was then.
Posted: 23 Dec 2017, 10:15
by Nuum
Not sure about the foam between the thin plastic sheet and the switch plate, but the plastic sheet itself was where I put the electric tape. Not sure, why I did that, though, probably because I didn't find a good method to attach the plastic strips again.
Posted: 23 Dec 2017, 12:20
by pansku
Oh shit. I didn't notice the strip back in november. Anyways more progress:

- Mmm beam springs
- IMG_20171223_123120.jpg (3.49 MiB) Viewed 5539 times

- Packed up and ready to rumble
- IMG_20171223_131728.jpg (3.64 MiB) Viewed 5539 times
Posted: 04 Jan 2018, 13:30
by pansku
Time to cook some keycaps this weekend. Who woulda thunk that the cheapest source of hydrogen peroxide I managed to find would be a plant nutrient


- Great things come in surprising packages
- IMG_20180104_142825.jpg (2.75 MiB) Viewed 5496 times
Posted: 04 Jan 2018, 15:21
by Wodan
Damn even the good 12% stuff ...
Posted: 04 Jan 2018, 15:48
by codemonkeymike
@pansku, what did you end up doing to the raw metal plate? Did you clear coat it or something?
Posted: 04 Jan 2018, 15:59
by pansku
At the moment it is galvanized with zinc. I will consider getting it chromate converted if I happen to come across another company that is willing to do it for cheap.
When the business only has 2 guys and the other one didn't even have a clue what needed to be done despite the first one agreeing on what needs to be done and for how much. And when I picked it up the first guy still didn't know I had brought it there when I even talked to him on the phone the morning I gave it to his brother/associate. That kind of experience really makes you lose trust on the company and the people behind it.
Posted: 04 Jan 2018, 20:01
by codemonkeymike
pansku wrote: At the moment it is galvanized with zinc. I will consider getting it chromate converted if I happen to come across another company that is willing to do it for cheap.
When the business only has 2 guys and the other one didn't even have a clue what needed to be done despite the first one agreeing on what needs to be done and for how much. And when I picked it up the first guy still didn't know I had brought it there when I even talked to him on the phone the morning I gave it to his brother/associate. That kind of experience really makes you lose trust on the company and the people behind it.
Indeed, I was looking for someone to do a chromate coating on myne. Zinc is easy but a little moisture will set some oxidation in motion on it.
Posted: 05 Jan 2018, 16:33
by pansku
Posted: 05 Jan 2018, 22:12
by pansku
Sigh, the retrobrighting sure didn't go as planned. Test methodology: 1 litre of watee, 2 capfulls of H2O2 at start, 1 capfull at around 1h, 1 capfull at around 2h. Grey one sunk at 00:00:00 as water hit 70°C, black one at 02:00:00. Water tempereture 70°C ± 5°C whole time. Results not so good.

- Fail 1
- IMG_20180105_230417.jpg (2.15 MiB) Viewed 5426 times

- Fail 2
- IMG_20180105_230421.jpg (1.93 MiB) Viewed 5426 times

- Epic fail 3
- IMG_20180105_230427.jpg (2.12 MiB) Viewed 5426 times
I'm going to have to come up with another plan or these caps shall remain yellowed. UV won't be an option for months as the sun shines so low and so little time per day at 60°59' N
Posted: 05 Jan 2018, 23:21
by codemonkeymike
Did you stir it the whole time or did you let the cap sit at the bottom of the pan?
Posted: 06 Jan 2018, 00:01
by pansku
It basically stirred itself as when the tempereture and concentration changed the keycap moved between stages of sinking, floating somewhere in the middle and floating on the surface.
Posted: 19 Jan 2018, 19:19
by pansku
Well well well, what do we have here?
The bottom part now has a fresh coat of paint

I couldn't resist putting it all together. Also now it has a solenoid driver too
I just hope the sound gets better when it is fully assembled with feet.
I still need to clean up the case top and try retrobrighting again in the summer when UV radiation is available and get some feet as only 3 of the original 4 are to be found. Unfortunately one of the stabmounts on the spacebar has broken somewhere in transport so now it has a temporary fix. Pics:

- The body
- IMG_20180107_164502.jpg (3.68 MiB) Viewed 5300 times

- Fresh coat of paint
- IMG_20180119_184110.jpg (3.73 MiB) Viewed 5300 times

- A solenoid
- IMG_20180119_195911.jpg (3.13 MiB) Viewed 5300 times
A quick typing demo: