The latest revision of my Pocket Tetris Keyboard
Posted: 17 Mar 2016, 01:10
The story begins with my Cooler Master Storm Quickfire TK with Cherry MX Brown switches. My main desktop at home had little room on the keyboard slider, and I was not ready to sacrifice a ten-key for the sake of saving space. I thought the Quickfire TK would be a great solution. It had a full keypad and maintained the traditional arrow key layout in the when the num-lock was disabled. The arrow key's are essential to my keyboard needs for one very specific game.
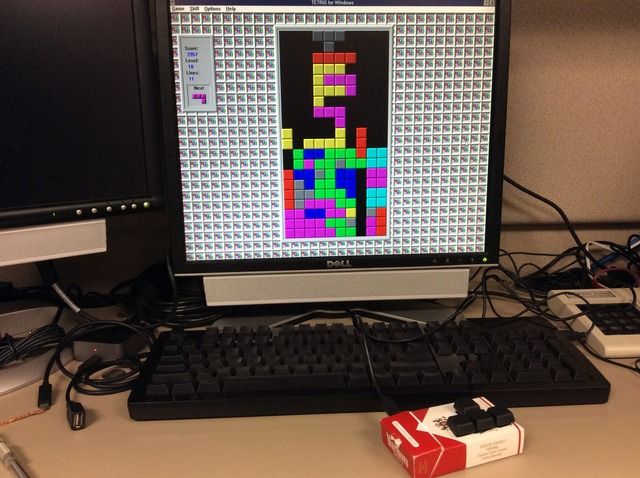
In 1993, my father built our household's first x86 machine loaded with my inaugural OS, Windows 3.1. Then one day he brought home from work a 3.5" floppy with the lone word "Games" scribbled on the label. This copy of Microsoft's Best of Entertainment Pack was my very first bootleg game. Included in this compilation was simply title "Tetris for WIndows." This was the very beginning an over two decade devotion to an executable that weighs in under 100kb. By this time, a game sharing the same namesake was solely responsible for the countless AA's that had been devoured by my Game Boy in the couple of years that proceeded. But this version was different. There was no music. Aside from the Windows error ding chiming upon each completed line, the only sounds to be heard was the rhythmic clanging of the directional keys on the Model M. From that point on, I have made every effort to make sure that Tetris for Window's was on every computer I have ever own. Even when 64-bit windows started to become the standard and shed support for 16-bit applications, VirtualBox came to the rescue and I learned all I needed to know necessary to get a Windows XP virtual machine running. I eventually simplified things loaded Window's 3.1 onto a portable DOSBox on thumb drive and now I have the original experience in my pocket.
Back to the Cooler Master, I was never completely satisfied with its implementations. I found that the times that I really need my number pad were also times that the arrow keys are best for navigating, in particular when working with spread sheets. The one second required to lock the Fn key also proved to be a nuisance when wanting to switch between Media and traditional Function Keys. The $90 price tag was quite commitment for me at the time and I was unable to justify replacing it with a likely costlier tenkeyless board. Then one day the decision was made when one day my it malfunctioned. My wife was unable to sign in and when I attempted to sign in myself I noticed that bullets appeared in the password field when I pressed the shift key. I unplugged and lifted the keyboard to check if something was caught inside. Then lemonade came seeping out of the USB port and as I was wiping the desk and floor I finally noticed the empty cup on the ground near my desk.
I disassembled and examined. I found at least three diodes in the bottom row had exploded leaving a lovely green mess on my PCB and case. With my best feigned disappointed tone, I told my wife I had no choice but to replace it and promptly ordered a KUL tenkeyless with MX Clear switches that just so happened to be available on Amazon. Then the tinkerer in me immediately began desoldering all the switches and LED's. I had been lurking around these forums for a while and I wanted to dip my to into building my own devices.
I am proud to present to you all, Version 2 of my Pocket Tetris Keyboard:
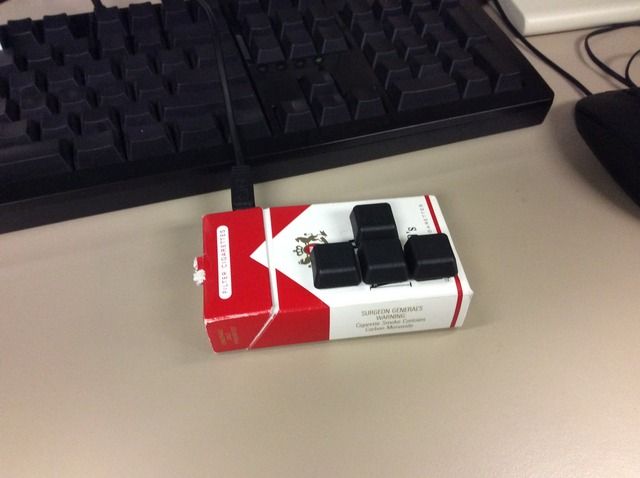
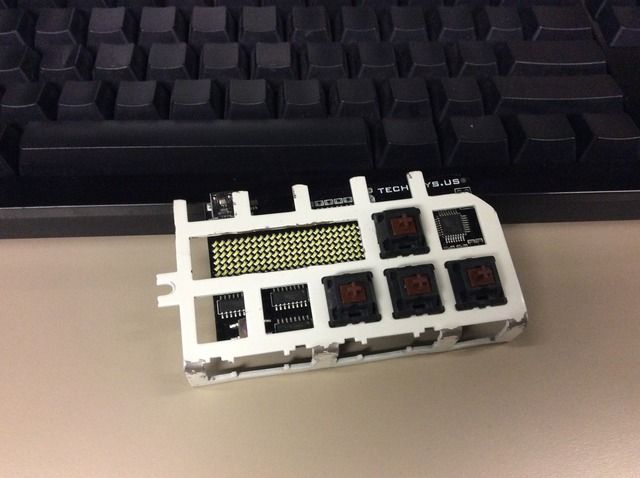
The heart of this little guy is a Techkeys.us programmable business card. In my first attempt I simply soldered the four switches to the board and cut a t-shape into a box of Camel Filters. Wanting more durability, I took a Dremel to the top plate of my dismantled Quickfire TK and and cut out the keypad portion. After pounding my new bracket into shape with my hatchet/hammer using the bumper of my Chevy as anvil, I desoldered and resoldered the switches. I changed the enclosure to a Marboro 100's box to allow proper fitting with out having to further trim the bracket.
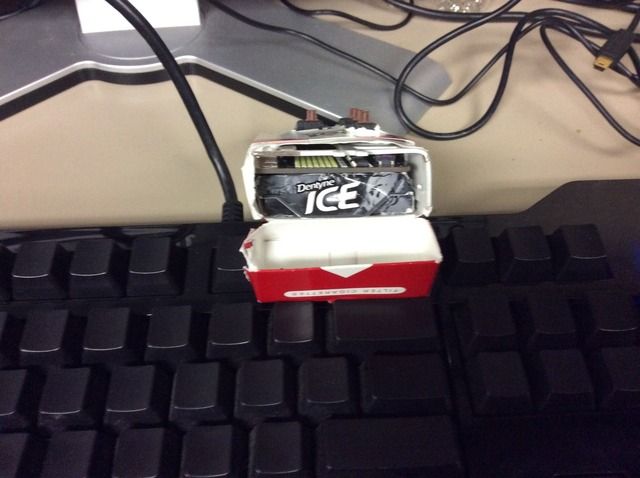
Next planned improvement will be replacing the current current Dentyne Ice pack with nice piece of hardwood as a proper spacer. I may cut out and opening to to allow viewing of the the LED array. I also may rig up a button to allow access to the program button.
Stay tuned to see the project I have planned for the rest of the the top plate and remaining switches. Also take note of the chassis of my upcoming custom keypad courtesy of the old key tronic unit from our old PCjr.

In 1993, my father built our household's first x86 machine loaded with my inaugural OS, Windows 3.1. Then one day he brought home from work a 3.5" floppy with the lone word "Games" scribbled on the label. This copy of Microsoft's Best of Entertainment Pack was my very first bootleg game. Included in this compilation was simply title "Tetris for WIndows." This was the very beginning an over two decade devotion to an executable that weighs in under 100kb. By this time, a game sharing the same namesake was solely responsible for the countless AA's that had been devoured by my Game Boy in the couple of years that proceeded. But this version was different. There was no music. Aside from the Windows error ding chiming upon each completed line, the only sounds to be heard was the rhythmic clanging of the directional keys on the Model M. From that point on, I have made every effort to make sure that Tetris for Window's was on every computer I have ever own. Even when 64-bit windows started to become the standard and shed support for 16-bit applications, VirtualBox came to the rescue and I learned all I needed to know necessary to get a Windows XP virtual machine running. I eventually simplified things loaded Window's 3.1 onto a portable DOSBox on thumb drive and now I have the original experience in my pocket.
Back to the Cooler Master, I was never completely satisfied with its implementations. I found that the times that I really need my number pad were also times that the arrow keys are best for navigating, in particular when working with spread sheets. The one second required to lock the Fn key also proved to be a nuisance when wanting to switch between Media and traditional Function Keys. The $90 price tag was quite commitment for me at the time and I was unable to justify replacing it with a likely costlier tenkeyless board. Then one day the decision was made when one day my it malfunctioned. My wife was unable to sign in and when I attempted to sign in myself I noticed that bullets appeared in the password field when I pressed the shift key. I unplugged and lifted the keyboard to check if something was caught inside. Then lemonade came seeping out of the USB port and as I was wiping the desk and floor I finally noticed the empty cup on the ground near my desk.
I disassembled and examined. I found at least three diodes in the bottom row had exploded leaving a lovely green mess on my PCB and case. With my best feigned disappointed tone, I told my wife I had no choice but to replace it and promptly ordered a KUL tenkeyless with MX Clear switches that just so happened to be available on Amazon. Then the tinkerer in me immediately began desoldering all the switches and LED's. I had been lurking around these forums for a while and I wanted to dip my to into building my own devices.
I am proud to present to you all, Version 2 of my Pocket Tetris Keyboard:

The heart of this little guy is a Techkeys.us programmable business card. In my first attempt I simply soldered the four switches to the board and cut a t-shape into a box of Camel Filters. Wanting more durability, I took a Dremel to the top plate of my dismantled Quickfire TK and and cut out the keypad portion. After pounding my new bracket into shape with my hatchet/hammer using the bumper of my Chevy as anvil, I desoldered and resoldered the switches. I changed the enclosure to a Marboro 100's box to allow proper fitting with out having to further trim the bracket.

Next planned improvement will be replacing the current current Dentyne Ice pack with nice piece of hardwood as a proper spacer. I may cut out and opening to to allow viewing of the the LED array. I also may rig up a button to allow access to the program button.


Stay tuned to see the project I have planned for the rest of the the top plate and remaining switches. Also take note of the chassis of my upcoming custom keypad courtesy of the old key tronic unit from our old PCjr.
