Page 7 of 40
Posted: 26 Nov 2011, 09:43
by 7bit
Much better now!
Is it possible to make a little change to the left Shift/< > keys?
Posted: 26 Nov 2011, 21:49
by litster
DXF files of all 5 plates are in this zip file.
Posted: 26 Nov 2011, 21:50
by litster
BTW, anyone has a Teensy 2.0 and can tell me the total thickness of it? I think we will use the version with pins, so that would be additional height.
Posted: 26 Nov 2011, 22:48
by litster
Would anyone use a case made out of cardboard?


- CardboardCase.JPG (99.05 KiB) Viewed 11782 times
Posted: 26 Nov 2011, 23:52
by nanu

- Totally.jpg (92.38 KiB) Viewed 11775 times
Posted: 26 Nov 2011, 23:56
by Minskleip
^ lol
And think if you spill coffee on it.
Posted: 27 Nov 2011, 00:21
by litster
Just make another one?
I have most of the design QCAD. I need to make room for the Teensy and rout the cable to the back. Also made room for the 6-pin connector on a real Filco. The case would work for both Phantom and Filco. I could get it laser cut using Acrylic instead of cardboard.
Posted: 27 Nov 2011, 00:42
by tsangan
Are those Cheetos stain i see on the right side of the casing

Posted: 27 Nov 2011, 03:05
by litster
Now I have it in QCAD.
Top layer:

- Phantom Case Layer 1 Top.png (19.29 KiB) Viewed 11757 times
For Filco Tenkeyless, this layer needs to be thicker to raise the top layer higher because of Filco's controller. This layer can be thinner for Phantom since its controller is under the PCB:

- Phantom Case Layer 2 Mid.png (16.42 KiB) Viewed 11757 times
Cut out for Phantom's controller on the left, Filco's 5-pin plug on the right, plus cable routing. I need to know how much the Teensy controller stick out from the keyboard PCB because I can tell how thick this layer need to me.

- Phantom Case Layer 3 Mid.png (20.09 KiB) Viewed 11757 times
The bottom layer:

- Phantom Case Layer 4 Bottom.png (15.81 KiB) Viewed 11757 times
If it is made with transparent acrylic and you look at it through the bottom layout, it would like like this:

- Phantom Case Layer 3 Mid - Flipped.png (11.76 KiB) Viewed 11757 times
Hum, I think I need to add a screw hole...
EDIT: Added another screw hole, and now a 7bit top layer.

- Phantom Case Layer 1 Top 7bit.png (10.25 KiB) Viewed 11748 times
EDIT2: LOL! I have a bug in one of the layouts. I will have to fix it or it would look goofy.
Posted: 27 Nov 2011, 11:46
by Minskleip
7bit layer, yey

Posted: 27 Nov 2011, 22:31
by wcass
measurements taken from teensy 2 with pins.
51.01mm x 17.74mm
from bottom of pin header to top of pcb: 4.66mm
from bottom of pin header to top of usb: 8.16mm
length of pins: 5.87mm
let me know if you need pictures
Posted: 27 Nov 2011, 23:11
by litster
wcass, your measurements for length and width look like Teensy++, is that correct? But I think the height should be the same between Teensy and Teensy++. Do you have the height measurement between the keyboard PCB (not the Teensy PCB) and the top of the USB connector, as if the Teensy with pins is soldered onto a keyboard PCB? Thanks.
Posted: 28 Nov 2011, 03:01
by wcass
yes, Teensy++ 2.0 - i have a Teensy around here somewhere, but can't find it right now.
from bottom of pin header (keyboard pcb) to top of teensy pcb: 4.66mm
from bottom of pin header (keyboard pcb) to top of usb: 8.16mm
Posted: 28 Nov 2011, 05:43
by litster
Thanks wcass. I think they have similar thickness. Your numbers are very helpful. I can use it for getting a quote for cutting the plates. I also ordered a Teensy 2.0 that should arrive Tuesday or Wednesday as it is only about 300 miles away from me.
Posted: 29 Nov 2011, 12:39
by Tarkoon
We could need one version of the top layer more:
All plates have the holes for the five additional keys above the arrow keys, but
- the standart top layer does not support these keys
- the 7bit top layer does support them, but the Fx-row is not devided
So we would need a version with devided Fx-row and full block above the arrows!
Posted: 29 Nov 2011, 18:00
by litster
Tarkoon, drawing that layer is a 2 minute job. That's easy. Adding another item to the parts list is more problematic. If the first prototype case turns out OK, we will see what we can do next.
Posted: 29 Nov 2011, 21:21
by Findecanor
I'm thinking of making myself a case out of oak, but I anticipate that the narrow space in-between the main and arrow clusters could be problematic.
I have saved the case of my old Key Tronic KT-800 and maybe that case would fit the Filco/Phantom innards ... Only a little plastic surgery required.
Posted: 29 Nov 2011, 22:15
by Gilgam
i wanted to make one in wood too

how do you think it can be ? (i have no skills at all, but i can learn

)
Posted: 29 Nov 2011, 22:44
by 7bit
Gilgam wrote:i wanted to make one in wood too
how do you think it can be ? (i have no skills at all, but i can learn
)
Me too;-)
I recommend to just get a backplate plus a frame around it, but I'm no expert either

Posted: 29 Nov 2011, 23:13
by Findecanor
I don't have many skills either, mostly 20 year old memories from wood class in school and a few ideas. I tried some wood-staining recently, on a (ready-made) box and a chair, and I liked that result
A challenge would be to keep the grain in mostly one direction and not expose any end grain, because if you stain it, then end grain usually stains darker than the rest.
First, I think that I would construct a frame, in the same manner as a picture frame is constructed: cut strips of wood (some ready-made wooden trim) at 45° angles and glue together. Then, I would cut a 7mm thick wide plank into a single piece (if possible) to fit in-between the key groups and friction fit/glue this in. I anticipate that there will be a lot of adjusting it back and forth. Maybe I would have to cut and glue several small pieces of wood together, or in the worst case: use some other material and oak veneer (the horror).
I am not sure how to make the bottom. For myself, I want a keyboard that is as flat and low as possible with smooth sides. I think that I could perhaps make a ledge (by chiselling or routing) around the inside of the bottom of the frame and mostly friction-fit a rectangular piece of plywood, aluminium or plastic in there and secure it to the top with a few bolts through the holes in the PCB/plate that thread into metal grommets secured in the bottom of the top. The bottom would need to have a recess in it for the Teensy, but I think that it could be achieved by layering.
Posted: 30 Nov 2011, 22:55
by Gilgam
thanks for your detailed answer
i have the nearly same idea but i have to check that pcb and teensy before (or i'll try with a cut g80-1800).
Phantom Custom Keyboard Group Buy
Posted: 01 Dec 2011, 05:12
by litster
Meet the Phantom... case.
Need to eat dinner. More pictures later.
Posted: 01 Dec 2011, 06:09
by Minskleip
Hei! You got it made so fast!?
Posted: 01 Dec 2011, 06:26
by litster
I got lucky and found a way to get access to a laser cutter tonight. But I can't mass produce because I don't have access to the laser cutter at will. I need to refine the drawing to make it fit better. But right now it is very close to my expectation. One thing I won't do in the future is to cut the "Phantom" word on the 3rd layer because that took a LOOOOONG time to cut. Speed had to be slowed down because that piece is so thick. Engraving maybe a possibility.
Then we can find a shop to cut it. It will be over $200 though unless we find some shop that is cheaper.
Posted: 01 Dec 2011, 07:32
by litster
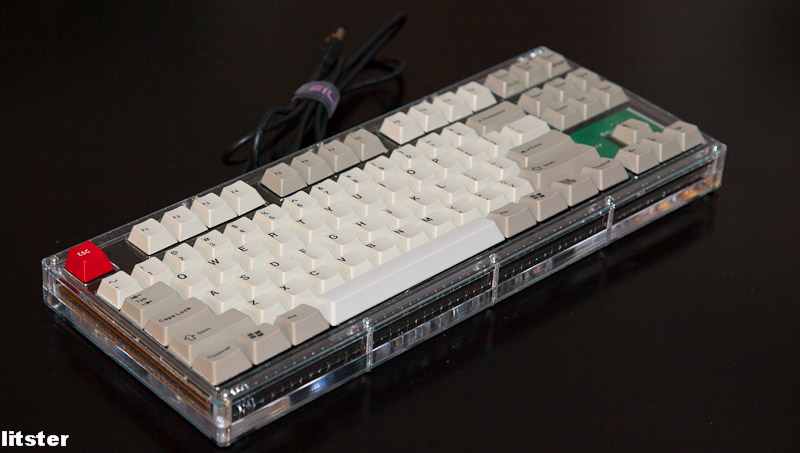
A couple more pictures:

- Phantom Acrylic Case-1.jpg (100.94 KiB) Viewed 11632 times

- Phantom Acrylic Case-2.jpg (139.12 KiB) Viewed 11632 times
Thing I need to do or think about:
- 2nd layer needs to be a tad thicker for Filco. Not a problem with the actual Phantom.
- lower screws count from 11 to 8, don't really need that many screws.
- right now the PCB is sitting on the bottom later. A better way to do this is to glue a few acrylic posts to support the plate instead. Need to engrave the post positions. Notices the PCB has already scratched the bottom layer. If we do this, the 3rd layer needs to be thicker.
- need to move the cable cut out to center. I underestimated how long the cable is.
- the second layer needs to be a tad wider and longer than it is now. maybe 0.5mm. Right now it is a super tight fit. Need final plate and PCB to determined final size.
- Need to back legs. Currently it is too flat.
- The top layer is OK, but I can move some key holes a little bit to center the holes to keycaps. Need to way for the final plate cut to determine final key hole locations.
Round out the inside corners for the 3rd layer.
- I need better screws. Please, any suggestions for better screws? these from Lowe's sucks. They are too long and I had to Dremel them.
- I got my Teensy today. The 3rd layer's thickness is perfect.
- should we make the case both Phantom and Filco compatible?
- as much as I have cut out, the case is HEAVY! Is that good?
- the Phantom wording took a long time to cut, especially because that layer is so thick, the laser need to run slower to cut it. It barely cut through. For the final version, I don't think the word Phantom will be cut. Maybe engraved.
Posted: 02 Dec 2011, 14:23
by Half-Saint
Sweet acrylic case
Why would I want to choose 7bit's layout? Those huge top row keys don't really make all that much sense to me.
Re: Phantom Custom Keyboard Group Buy
Posted: 02 Dec 2011, 15:46
by Minskleip
Half-Saint wrote:Why would I want to choose 7bit's layout? Those huge top row keys don't really make all that much sense to me.
They're nice to mash
Posted: 02 Dec 2011, 18:20
by mrog
Hi, I'm new to the boards - I found it while looking for IBM Model M keyboards for sale (still looking for a ISO/UK layout). From what I gather in the posts here and on geekhack - the phantom was designed to create a replacement board for the felco so that cherry switches can be used throughout so you can use doubleshot injection molded keycaps?
It looks like now you've got all the parts to throw together a complete keyboard - or are you still harvesting parts from other complete keyboards?
I currently have no mechanical keyboard - but I grew up using a IBM model M, so have no parts.
I guess what I'm asking is - is it feasible for me to get involved in this and source all the parts required to make my own keyboard - with my choice (or design) of key cap, switch, layout and case while maintaining a reasonable price?
Sorry if any of my questions are misinformed - I'm very new to mechanical keyboards and I can't believe I've found people with the same fanaticism with user input devices as me - I've been reading the forum for two days straight (don't tell my boss).
You guys are great - I'm really glad I found this place.
Posted: 03 Dec 2011, 22:45
by trax
Dear handymen,
if any of you can make me a full, finished phantom keyboard please let me know.
I'll pay all the costs you need to make, and obviously a good price for the hard work you'd make.
If anyone is interested in making some cash over this, please send me a PM.
trax.
Posted: 03 Dec 2011, 23:36
by webwit
litster wrote:A couple more pictures:
That looks really great.