About a week ago I found an IBM Model F and began to search how I could get it working with my computer. To my disappointment, Soarer's solution didn't work with the Teensy 3.1 that I had on hand. It took several hours of work over the course of three days for me to get the keyboard all up and working, and a few more days to clean up the code.
Porting Soarer's code to the Teensy 3.1 would have saved me quite a bit of time, but unfortunately he hasn't released the source. This is my attempt at creating an open source "branch" from what he started. Theoretically, this is compatible with all Teensy boards other than the Teensy 1.0/1.0++ (need to change the LED pin for Teensy 2.0/2.0++).
Currently, the code is as optimized and documented as I can do without feedback. This branch is limited to XT, but if there is enough demand I may start a separate open source AT branch.
RIGHT NOW ONLY THE FIRST 83 KEYS ARE SUPPORTED. I need volunteers to test with larger keyboards!
Keyboards currently supported:
- IBM Model F "XT" (83 key) [verified]
- Other XT-set 1 keyboards
- Teensy 3.2
- Teensy 3.1 [verified]
- Teensy 3.0
- Teensy++ 2.0
- Teensy 2.0
- 6 Key rollover minimum (10 max)
- Dual-layered function keys (toggle with NumLock)
- Bypassing of keyboard's built-in key repeat
- Porting to other Arduino boards is not too difficult
- If you hold down both shift keys and then release them, shift stays on until you press and release it again.
- Both shift keys map to left shift.
Please inform me of any feature requests you may have, or bugs you find.
- Add generic Arduino code version for wider microcontoller support.
- Change Teensy from mouse+keyboard+joystick to Keyboard only
- Add extended XT keyboard support (volunteers needed)
Setup
Choose either the MAIN or ALTERNATE builds. Main is standard key layout, alternate swaps the control and alt keys to better resemble modern keyboards.
Currently, only XT is supported:

Note: DOUBLE CHECK! Bad wiring is baaaad!
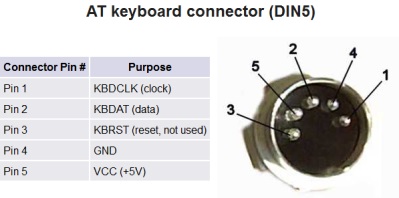
Teensy ------ Keyboard
Vin ---------- Vcc +5v
PD2 --------- Clock
PD3 --------- Data
GND -------- GND
Note: I'm trying to keep TX and RX open for development purposes.
Set up Teensyduino so you know how to compile and upload to controller.
Follow these settings in the Arduino IDE:
(Make sure you set the board to YOUR version of Teensy)

Finally, load up the .ino and then simply upload to the board if you have a Teensy 3.1.
If you have a Teensy 2.0 or 2.0++, change LED_Pin in the sketch to 11 or 6, respectively.
You will probably get a warning saying that the Teensy didn't reset. Ignore it, this happens often when you are in USB HID mode.
If everything went smoothly, you should now have it up and running!
