
I would also add holds for direct soldering of the cable to the pcb. I have many cables with the wrong connector at one side that I would not mind to cut
Universal Model M Controller
-
Muirium

- µ
- Location: Edinburgh, Scotland
- Main keyboard: HHKB Type-S with Bluetooth by Hasu
- Main mouse: Apple Magic Mouse
- Favorite switch: Gotta Try 'Em All
- DT Pro Member: µ
Thanks Phospor! (i$, you got ninja'd!)phosphorglow wrote:Can and will do!Muirium wrote: Could you leave a set of through holes for the 4 USB lines, for those of us who like to string up our own socket on the keyboard chassis? That'd be mighty convenient! If so, labels please!
The standard names and numbering are here:
http://pinouts.ws/usb-pinout.html
Going to need this little provision for terminal boards anyhoo.
-
phosphorglow

- Location: Indianapolis - USA
- Main keyboard: IBM Model M
- Main mouse: Kensington Expert Mouse
- Favorite switch: Buckling Spring!
- DT Pro Member: -
- Contact:
-
phosphorglow
- Location: Indianapolis - USA
- Main keyboard: IBM Model M
- Main mouse: Kensington Expert Mouse
- Favorite switch: Buckling Spring!
- DT Pro Member: -
- Contact:
Micro provision.
I don't know if I'm too hip to the idea of only having two solder pads for mounting, but it fits!
I don't know if I'm too hip to the idea of only having two solder pads for mounting, but it fits!
- Attachments
-
- controller2.jpeg (20.02 KiB) Viewed 9230 times

-
Halvar

- Location: Baden, DE
- Main keyboard: IBM Model M SSK / Filco MT 2
- Favorite switch: Beam & buckling spring, Monterey, MX Brown
- DT Pro Member: 0051
Thanks for the changes regarding pins!
I'm using a Lipo Rider. A .sch file is linked to somewhere on that wiki page, and I found a printout of an older version of the schematic on this page: http://www.radiolocman.com/shem/schemat ... ?di=111557 . It's more parts than I would have thought.
-
phosphorglow
- Location: Indianapolis - USA
- Main keyboard: IBM Model M
- Main mouse: Kensington Expert Mouse
- Favorite switch: Buckling Spring!
- DT Pro Member: -
- Contact:
-
phosphorglow
- Location: Indianapolis - USA
- Main keyboard: IBM Model M
- Main mouse: Kensington Expert Mouse
- Favorite switch: Buckling Spring!
- DT Pro Member: -
- Contact:
Neat! I'll play around and see if I can get everything to play along nicely in the layout.Halvar wrote: Thanks for the changes regarding pins!
I'm using a Lipo Rider. A .sch file is linked to somewhere on that wiki page, and I found a printout of an older version of the schematic on this page: http://www.radiolocman.com/shem/schemat ... ?di=111557 . It's more parts than I would have thought.
Any suggestions as to what ports I should keep on the left hand side and what I should move to breadboard land?
-
phosphorglow
- Location: Indianapolis - USA
- Main keyboard: IBM Model M
- Main mouse: Kensington Expert Mouse
- Favorite switch: Buckling Spring!
- DT Pro Member: -
- Contact:
-
Muirium
- µ
- Location: Edinburgh, Scotland
- Main keyboard: HHKB Type-S with Bluetooth by Hasu
- Main mouse: Apple Magic Mouse
- Favorite switch: Gotta Try 'Em All
- DT Pro Member: µ
Direct wiring! Many of us like to install our own sockets in the case, for a nice finished look. When dealing with a Teensy (or anything else with integrated sockets that will lie deep inside the shell) we wind up having to hack apart an appropriate USB cable. One end plugs into that socket, and the other end gets spliced onto our own panel mount socket on the case. It's a fiddly, dirty job I'd rather avoid with helpful through-holes for easy access to the 4 lines which make up USB.
-
phosphorglow
- Location: Indianapolis - USA
- Main keyboard: IBM Model M
- Main mouse: Kensington Expert Mouse
- Favorite switch: Buckling Spring!
- DT Pro Member: -
- Contact:
Okie dokie! Gotcha. Plenty of room on the bottom for some extra through-holes. I'll add 'em in.Muirium wrote: Direct wiring! Many of us like to install our own sockets in the case, for a nice finished look. When dealing with a Teensy (or anything else with integrated sockets that will lie deep inside the shell) we wind up having to hack apart an appropriate USB cable. One end plugs into that socket, and the other end gets spliced onto our own panel mount socket on the case. It's a fiddly, dirty job I'd rather avoid with helpful through-holes for easy access to the 4 lines which make up USB.
-
Muirium
- µ
- Location: Edinburgh, Scotland
- Main keyboard: HHKB Type-S with Bluetooth by Hasu
- Main mouse: Apple Magic Mouse
- Favorite switch: Gotta Try 'Em All
- DT Pro Member: µ
Excellent!
I'm too thick to tell from your diagrams if you're intending to support the EZkey for Bluetooth. Or is that what the breadboard area is for?
I'm too thick to tell from your diagrams if you're intending to support the EZkey for Bluetooth. Or is that what the breadboard area is for?
-
phosphorglow
- Location: Indianapolis - USA
- Main keyboard: IBM Model M
- Main mouse: Kensington Expert Mouse
- Favorite switch: Buckling Spring!
- DT Pro Member: -
- Contact:
One PCB to bring them all and in the darkness bind them...

-
phosphorglow
- Location: Indianapolis - USA
- Main keyboard: IBM Model M
- Main mouse: Kensington Expert Mouse
- Favorite switch: Buckling Spring!
- DT Pro Member: -
- Contact:
Based on the info I'm getting from Halvar, yup!
I'm sure it will end up evolving to have a specific spot for the EZkey, but for the moment it's breadboard land.

-
Halvar
- Location: Baden, DE
- Main keyboard: IBM Model M SSK / Filco MT 2
- Favorite switch: Beam & buckling spring, Monterey, MX Brown
- DT Pro Member: 0051
I guess the EZkey can pretty easily be added optionally to work on the breadboard, all it needs are the UART pins and a few arbitrary extra pins, the rest is software. Only thing I'm not sure about is if the Bluetooth antenna on the EZKey's PCB will work well at that place directly under the metal plate, it might in the end be better to only solder a connector on the breadboard holes and put the actual EZKey somewhere else in the keyboard case. No problem though.
The more convoluted problem, because it would have to be thought about from the start, might be the battery, because now the power for the microcontroller is just coming from USB, and we would need a way to switch it over to the battery, and to load the battery when it's needed, and that might be harder to add later if it hasn't been designed in from the start.
-
0100010

- Location: DFW TX, US
- Main keyboard: IBM 4704 107
- Main mouse: Trackman FX
- Favorite switch: Buckling Spring
- DT Pro Member: -
Writeup of an EZkey build here : https://geekhack.org/index.php?topic=67087.0
-
phosphorglow
- Location: Indianapolis - USA
- Main keyboard: IBM Model M
- Main mouse: Kensington Expert Mouse
- Favorite switch: Buckling Spring!
- DT Pro Member: -
- Contact:
The USB area is going to bug me. I'm almost thinking 3D printed panel slot doodad. But my original idea was so much simpler - fabricate a nice little mylar cover that I can churn out on my electric cutter.
Need to find a much smaller right angle button and another with a long button stem, perhaps.
I really don't want to abandon the big honkin' USB-B connector. It seems appropriate since the SDL was so hardcore.
Otay. Now that I'm thinking out loud, Micro USB in bluetooth applications, with a smaller PCB that can be stacked over top with buttons/LED(s)/power switch. Smidgin bit more complicated, but less complicated than other alternatives I suppose. It'll look nicer and that will make me happy. Plus they'd be super cheap to have manufactured.
Looks like the ezkey modules are out of stock so I'll have to wait to buy one to fiddle with. I suppose elegant support will be in version 2.
Picture: Help! I can't get the firmware to load on paper! :X
- Attachments
-
- 2015-02-05 22.18.38.jpg (85.97 KiB) Viewed 9132 times
-
phosphorglow
- Location: Indianapolis - USA
- Main keyboard: IBM Model M
- Main mouse: Kensington Expert Mouse
- Favorite switch: Buckling Spring!
- DT Pro Member: -
- Contact:
Ooooh goody goody, thanks!0100010 wrote: Writeup of an EZkey build here : https://geekhack.org/index.php?topic=67087.0
-
Arakula
- Location: Austria, Europe
- Main keyboard: Unicomp PC/5250
- DT Pro Member: -
- Contact:
-
Muirium
- µ
- Location: Edinburgh, Scotland
- Main keyboard: HHKB Type-S with Bluetooth by Hasu
- Main mouse: Apple Magic Mouse
- Favorite switch: Gotta Try 'Em All
- DT Pro Member: µ
Aha!
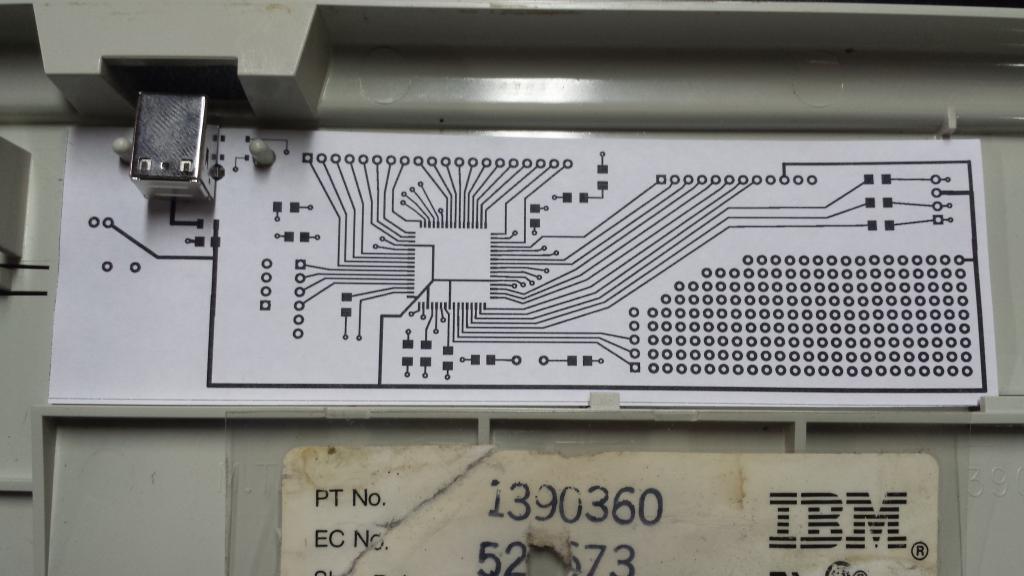
Stupid me, I didn't realise that was the placement you were going for with the PCB. Superb! I'm too used to Teensies and Xwhatsit's controllers where the socket is arbitrarily placed and it's down to you how you route it to the outside world. Given that all (non 122-key) Model Ms have similar case geometry, your idea is artful genius!
USB-B (for beastly) makes sense in that position. Although I do generally prefer the smaller connectors like Mini and Micro USB which actually have higher rated connect/disconnect lifetimes; there is something to be said for a big brute succeeding from SDL! I'm still in favour of a backup through-hole footprint so we can jimmy up our own connectors, in any case.
I'd wait (or ask around) for an EZkey before going further on this, though, as Bluetooth is far and away the most appealing thing about this controller. Well, unless you can make the USB-only version about the same price as a Teensy of course! It's already looking more elegant for this job.


-
Halvar
- Location: Baden, DE
- Main keyboard: IBM Model M SSK / Filco MT 2
- Favorite switch: Beam & buckling spring, Monterey, MX Brown
- DT Pro Member: 0051
Is bluetooth really the most important feature? After all this is still a Model M, which is not one of the most "mobile" keyboards from the start... My guess is what phosphorglow is originally aiming for is mainly the ability to make and sell fully refurbished, bolt-modded and modernized Model Ms that come with a programmable USB controller from the start, for a crowd that wants the quality and retro look of a Model M but no hassle. For that goal, bluetooth might actually be a less important goal, right?
To have a bluetooth controller for the Model M as a "sellable product" (although small scale) would also be a great goal of course, but I guess it would probably look different, not based on this microcontroller and an Adafruit EZKey...
So I guess it's a good compromise to have the option to add bluetooth to this with easily available components and a bit of (more or less) easy assembly required, and maybe go for a full bluetooth design in a different installment.
-
Muirium
- µ
- Location: Edinburgh, Scotland
- Main keyboard: HHKB Type-S with Bluetooth by Hasu
- Main mouse: Apple Magic Mouse
- Favorite switch: Gotta Try 'Em All
- DT Pro Member: µ
True. I'm coming at it from my own perspective, of course, where I have a nice external metal boxed Soarer Converter that I use with a whole bunch of boards at my desk. USB Model Ms seem like a solved problem to me. But I agree this is not so for people starting from scratch and looking to buy an all in one.
As for Bluetooth: as much as I like a good thick coiled IBM cable, I'm anti-wires really. Especially when it comes to working with my laptop, where they jut out of the side and provide a snag hazard for a klutz like me. I'm forever getting cables grabbed by chairs and the like. Bluetooth is so much more elegant. As much as I loathe the flimsy feel of my Bluetooth Apple Keyboard, I adore its connection! That in an SSK please!!
As for Bluetooth: as much as I like a good thick coiled IBM cable, I'm anti-wires really. Especially when it comes to working with my laptop, where they jut out of the side and provide a snag hazard for a klutz like me. I'm forever getting cables grabbed by chairs and the like. Bluetooth is so much more elegant. As much as I loathe the flimsy feel of my Bluetooth Apple Keyboard, I adore its connection! That in an SSK please!!